View the updated version of this article on the new Retreaver support site
https://learn.retreaver.com/guides/how-to-tag-and-filter-calls-using-prompts
Call Handlers (Buyers) can have diverse and specific requirements for the types of calls they can accept. By routing callers to the Call Handlers (Buyers) most relevant to them, you can ensure that calls get routed to the most appropriate handler available to process that call, easily increasing your conversion rates and revenue per call.
Filtering and routing calls is achieved by specifying certain rules on your handlers using tags. There are several system tags that are automatically appended to each call which you could use to distribute traffic including: call source, caller id, caller city, caller state.
View our full list of available system tags in our "How to Create and Use Tags" guide to learn more.
In order to filter calls using your own desired custom attributes, you will need to create and apply those tag values to calls before they dial in, either through Tagged Numbers, Parameter Mapping, Interactive Voice Response or Real-Time Page Tracking.
Refer to our guide on "How to Add Data to Calls" to learn more about the various methods available to attach tags to calls and use them for filtering and routing purposes.
IVR Enabled Tags Overview
Creating an IVR enabled tag
In the example below, a new Tag is being created with the goal of having Call Endpoints (Buyers) only receive calls from employed individuals.
- Under the Tags section in the left menu, click + New Tag to begin.
- Provide an appropriate name (without spaces), then apply a unique color for the tag.
- Toggle the prompts field to Enabled then add a voice prompt to ask the caller a question in order to resolve the Tag value. You may choose to use our provided text-to-speech system or supply an audio file.
Once you hit Create Tag, you can now see a simple overview of the information:
When a call comes in without a value assigned to the "currently_employed" tag, the above text-to-speech ( or Audio ) prompt will play requiring the caller to dial a number on their key pad which will assign a value to the tag.
After checking the tag overview and confirming that the information is correct, it's time to configure your Call Endpoint (Buyer) to only receive calls with the desired value.
Applying tags on a call endpoint (Buyer)
Bring up your call endpoint (Buyer) and click Edit then scroll down to the Tags section. Retreaver's robust Tag Wizard allows you to to easily add Tags to your handlers. Tags placed on an endpoint are used as filters for the calls they will receive.
If using tags are new to you, we strongly recommend that you also check our How to Use Tags and Tag Operators guide to familiarize yourself with the tag system.
On the following screen, choose the Tag type and enter your newly created Tag with the desired Value.
Here we have specified that this handler will only accept calls if the "currently_employed" tag value is "yes".
Once you're ready, hit Add and Done and be sure to save your changes.
Warning
You may also key in Tags manually by entering them in the format tag_key:value. However, we strongly recommend the Wizard for beginner uses to ensure no errors occur when assigning tag values.
Now whenever a call comes in, Retreaver will evaluate the call and the Call endpoint (Buyer) to see if the tags match before routing to this endpoint.
The example above requires the callers to be employed Californians in order for it to be routed to this Call Endpoint (Buyer).
Note
If the call contains a tag , but the call endpoint (Buyer) does not have any tag values assigned to that key, the call will be routed as the endpoint is not filtering for that tag value.
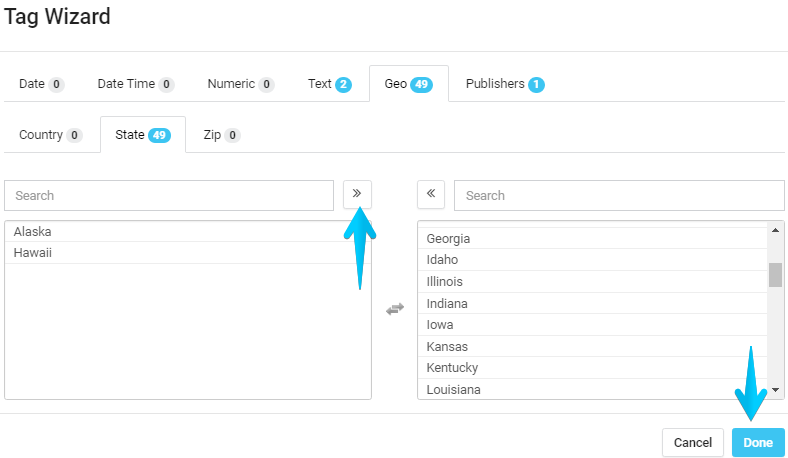
Applying geographical tags on a call endpoint (Buyer)
When dealing with national ad campaigns, we often find that companies want to route callers to their local office. We also see situations where a call buyer has requirements that target certain states due to profitability or regional regulations.
Retreaver makes it simple to route calls based on the caller's location. Calls that come in are automatically tagged with geo tags which can be added to your Call Endpoints (Buyers). The geo tags are based on the caller ID area code and can be refined by adding a zip code prompt.
In the image above using the Tag Wizard, all states except Alaska and Hawaii will connect with this Call Endpoint (Buyer).
Geo tags come in the following format:geo:[ISO 3166-1 alpha-2 country code](-optional state, province or zip).
For American based geo tags, the syntax format would be: geo:us-ca.
This would tag a component with a California state tag.
For Canadian based geo tags, the syntax format would be: geo:ca-bc.
This would tag a component with a British Columbia province tag.
For American zip codes, the syntax format would be: geo:us-90210.
This would tag a component with a "90210" zip code.
View the How to Filter Calls by Zip Code guide for more information on how to set up Zip code prompts for your campaigns.
Comments
Please sign in to leave a comment.